Part 23: Using a Visual Schedule
A visual schedule is a display of words and/or pictures of what is going to happen during the day or part of a day.
The visual schedule helps your child learn the sequence of steps to be completed to get through the day’s activities. A visual schedule can make the sequence more predictable thereby reducing your child’s anxiety about learning a new skill. See the Milestones Visual Supports Toolkit for more information.
To develop a visual schedule to use during toilet training:
- Decide the activities to be displayed including typical parts of the day as well as toileting trips.
- Keep to the usual times of days for activities and add six toilet trips at times that your child is most likely to have to go to the bathroom. You can use your observations of his toileting patterns as described in Part 1: What to Consider Before Getting Started .
- Decide the pictures and words you will use. You can take photos of the different items to be used in the bathroom (e.g., toilet paper, toilet, faucet, handle for flushing, etc.) If your child is in school or daycare, coordinate and share with the staff the words and visuals to use; they can be a resource for pictures and for developing a picture schedule.
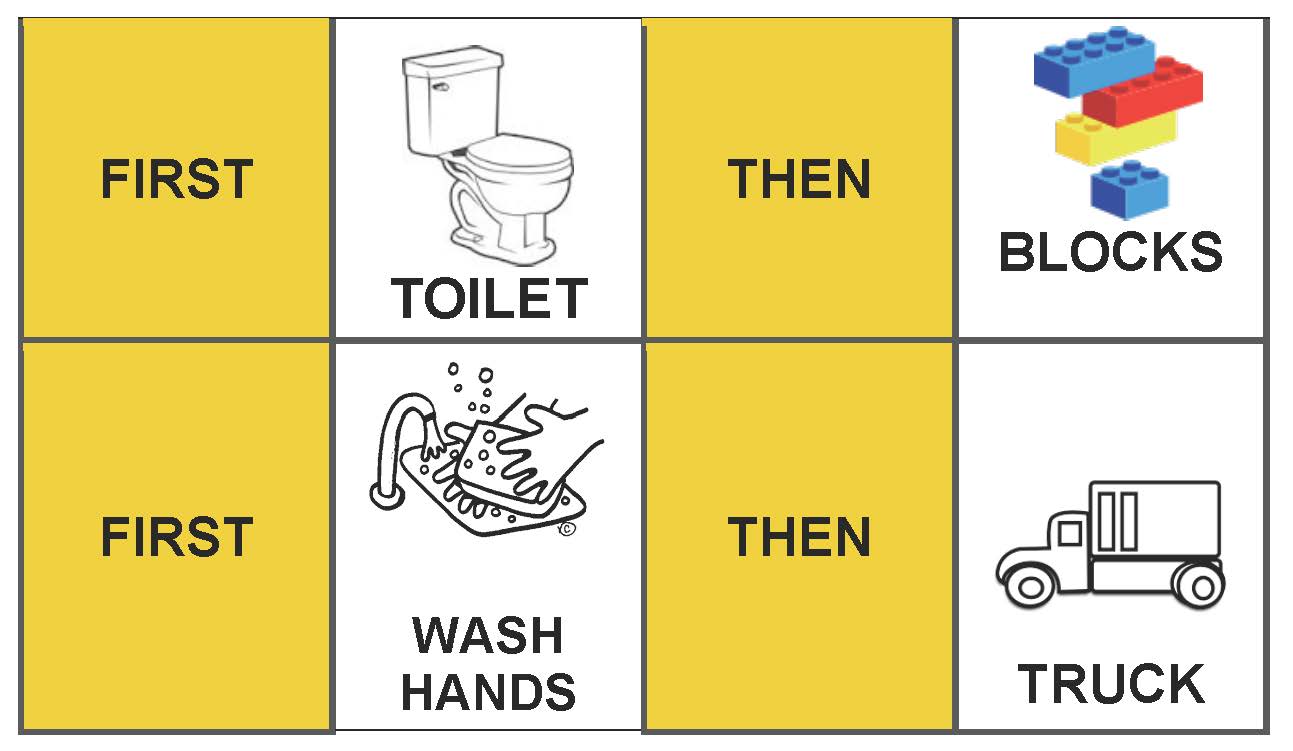
- Place the pictures in the order in which the parts of the sequence will occur. You can do this on a piece of cardboard, an open file folder, or even a piece of paper. Make sure that a non-preferred activity (this may include toilet trips!) is followed by a highly preferred one. For example, a toilet trip may be followed by reading a favorite book. Think of this as a “first, then” sequence and not a reward for completing the non-preferred activity. Tell your child, “First, TOILET, then BLOCKS.”
- In addition, provide praise and/or other rewards for following the schedule. For example, for every four completed activities, you can give your child a small favorite food item. See Part 9: Using Rewards for suggestions.
- You may want to laminate the board for sanitary reasons and also so that your child can cross off each activity once he has completed it with a wet erase marker. At the end of the day, wipe the board clean so it is ready for the next day.
Print this blank chart to use at home
-
Toilet Training Tool Kit
- Parts 1 & 2: Getting Started
- Part 3: Toilet Training Steps
- Part 4: Developing a Toileting Plan
- Part 5: Habit Training
- Part 6: Creating a Calm & Welcoming Bathroom Environment
- Part 7: Communicating with Your Child
- Part 8: Fear of New Situations
- Part 9: Using Rewards
- Part 10: Toilet Training Away From Home
- Part 11: Cooperation Between Home and School or Daycare
- Part 12: Dealing With Your Own Anxieties and Frustrations
- Parts 13 & 14: Interfering Factors
- Part 15: Diapers & Pull-Ups During Toilet Training
- Parts 16 & 17: Toilet Training Older Children
- Part 18: Success at Home But Not at School or Vice Versa
- Part 19: Use of Books, Videos & Other Visuals
- Part 20: Toilet Training at Night
- Part 21: Handling Accidents
- Part 22: Increasing Independence With Toileting
- Part 23: Using a Visual Schedule
- Parts 24 & 25: Regression & Troubleshooting
- Parts 26 & 27: References & Resources


